
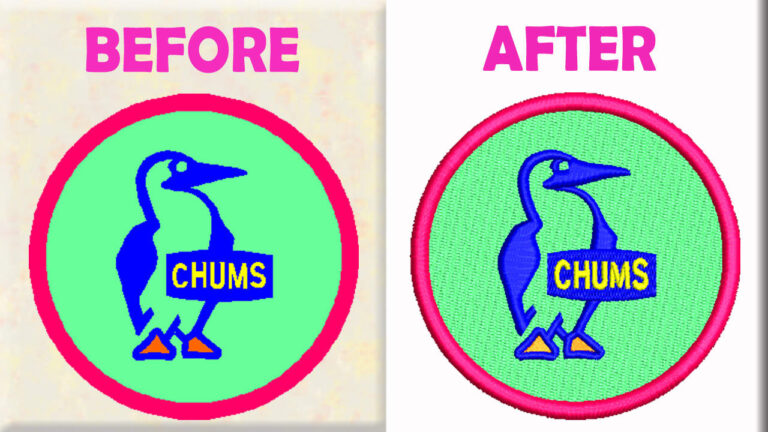
Converting a PNG image to embroidery requires a process known as “digitizing.” Digitizing is the process of converting a digital image into a format that an embroidery machine can read and stitch.
Your favourite photos and designs can be turned into stunning, textured works of art with embroidery, a timeless medium. Engraving a PNG image into an embroidery design can be a creative and rewarding process, whether your goal is to decorate your home, make personalised clothing, or make unique gifts. You’ll be excited and motivated to give digital embroidery a try after reading this article, which will take you on a thorough tour of the intriguing world of the craft and offer insights into the conversion process.
Convert a PNG to Embroidery - Basic Steps
1. Choose the Right Software
Specialised software for digitising embroidery is required. Wilcom, Embird, and Hatch are a few well-liked choices, but there are plenty more. Verify that you are familiar with the software’s features and that you have access to it.
2. Import the PNG Image
To convert a PNG image to embroidery, open your digitising software and import it. This will provide your embroidery design with a visual reference.
3. Trace the Design
Trace the design by hand using the software’s tools to turn it into a stitch pattern. In this process, the design’s outline and fills are defined, stitch types are specified, and parameters like stitch length, density, and underlay are adjusted.
4. Set Thread Colors
Choose the thread colors you want to use for your embroidery design. Most digitizing software will allow you to select from a library of thread colors or input custom ones.
5. Optimize Stitching Order
Decide which order the various design elements will be sown by the embroidery machine. Usually, this entails filling in the interior first, then contouring the design, and finishing with underlay stitches.
6. Preview and Adjust
It’s a good idea to preview the design in the software before committing to it completely to make sure there are no problems, such as misaligned elements, jump stitches, or trims. As needed, make adjustments to guarantee a crisp and seamless embroidery.
7. Save the Embroidery File
Save the digital design in the proper embroidery file format after you’re happy with it. A few common formats are.DST,.PES,.JEF,.EXP, and others. The compatibility of your embroidery machine will determine the precise format you select.
8. Transfer the File to the Embroidery Machine
Using a USB drive, card reader, or other compatible methods—depending on your machine’s specifications—transfer the embroidery file to your embroidery machine
9. Load the Fabric and Thread
Load the fabric and thread into your embroidery machine. In the embroidery hoop or frame, be sure to fasten the fabric firmly.
10. Start the Embroidery
After choosing the design and thread colours, proceed with the embroidery procedure as directed by your embroidery machine. Keep an eye on the machine while it stitches the design to make sure everything goes according to plan.
The process of transforming a PNG image into an embroidery masterpiece is captivating and gives your digital dreams a real, artistic presence. It’s a means of creative expression and more than just a craft. By bridging the gap between technology and artistry, embroidery digitization produces textured and beautiful creations that captivate the heart and imagination.
You can become an expert in the field of embroidery digitization and realise your digital visions one stitch at a time with the correct software and practise. Enter this creative realm without hesitation, and transform your digital aspirations into exquisite embroidered works of art. Let your creativity run wild and see your creations come to life, ready to add beauty, sentiment, and individual flair to your surroundings.
Our Embroidery Digitizing Service Reviews
Digi Embroidery provides highly recommended embroidery digitizing services. Our digitizing service is highly recommended to our clients. As a result, we have got 5-star ratings from our 98% of clients. Here you can check our reviews from the clients. We are very happy with our client’s satisfaction. Because, when a client satisfies an your service and support. That’s really glad to hear when someone like that and you are giving your best to them besides business.
Embroidery digitizing is really a handcrafted work that we digitize in the software very carefully. Because it is very difficult to make good quality sometimes. So, a digitizer is always tries to digitize a file with full mind’s attention.
Thanks for reading this article about how to convert image to embroidery file free now. Hope you have learned many things about embroidery digitizing from this article. Feel free to let us know any suggestions and information that you need about digitizing or embroidery. Stay connected with us with our Embroidery Digitizing Facebook Page.
Share this:
- Click to share on Twitter (Opens in new window)
- Click to share on LinkedIn (Opens in new window)
- Click to share on Tumblr (Opens in new window)
- Click to share on Facebook (Opens in new window)
- Click to share on Pinterest (Opens in new window)
- Click to share on WhatsApp (Opens in new window)
- Click to share on Reddit (Opens in new window)